 Tutorials
Books
Videos
Forums
Tutorials
Books
Videos
Forums


This is an archived tutorial from the kirupa.com legacy collection. It covers software that may no longer be available, but it is kept online because the ideas still hold up.
Since there aren't many good tutorials online for creating isometric games, I encountered many problems while making my isometric game. Since I am a nice guy, I'd like to share some tips and tricks that I learned, and I hope that they will be inspiring to other Flash developers such as yourself.
These tutorials are all about isometry, or, more specifically, about creating a "filmation" isometric game similar to Knight Lore.
 |
Note |
|
These tutorials can be used for programming an isometric game in many programming languages not just in Flash. They are more about game programming than about Flash programming. |
|
Some of the tutorials that I hope to write in the future will expand upon what I cover today with isometric drawing, hit tests, push-flags, walls and doors handling, maps, depth sorting (which I found to be the hardest part) and all kinds of related stuff.
But, we are getting a little ahead of ourselves. Let's learn about isometric transformations first!
Static
isometry
I have to point out that
Senocular's tutorials are excellent for the introduction to
isometry and it's problems, but there are many things that
cannot be done by using this (as I call it) "static isometry"
approach.
With "static isometry" I assume that the majority of the objects are "fixed" to the floor, meaning they cannot be moved. Their levels cannot be changed - depth sorting is done by changing the level of the main character only.
Dynamic isometry
Dynamic isometry assumes the following rules:
The Facts
I'd like to
start out with two facts which seems are not so obvious to
everyone.
 |
Fact Number 1 |
|
All things (calculations etc.) have to be done in 3d coordinate system, and then transformed into 2d using isometric transformations. |
|
I've seen some attempts of trying to use Flash's hitTest function to detect collisions in isometry. But, as I said - they are only attempts, because of rule number 2:
|
|
Fact Number 2 |
|
Collision detection in isometric projection cannot be done using hitTest function. |
|
The reason you can't use collision detection with hitTest, is that the hitTest function is capable only of calculating 2d, rather than 3d collisions. So we'll have to come up with some other method.
But first, let's take a look at the coordinate systems we will be using.
Coordinate systems and transformations
We have 3 coordinate systems involved in isometric transformation equations:
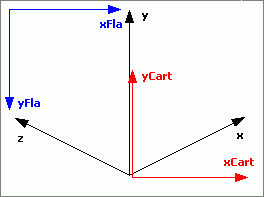
[ isometric, cartesian and flash coordinate system ]
An isometric coordinate system in the above image is colored black. The red one is cartesian, and a blue one is Flash coordinate system (which has an offset and reversed Y axis).
The functions for transforming 3d into 2d are:
// transforms x,y,z coordinates into Flash x coordinate
xFla = function (x, y, z) {
  // cartesian coordinates
  xCart = (x-z)*Math.cos(0.46365);
  // flash coordinates
  xI = xCart+xOrigin;
  return (xI);
};
// transforms x,y,z coordinates into Flash y coordinate
yFla = function (x, y, z) {
  // cartesian coordinates
  yCart = y+(x+z)*Math.sin(0.46365);
  // flash coordinates
  yI = -yCart+yOrigin;
  return (yI);
};
A few words about these functions:
0.46365 (radians) - it's a
“classic” 1:2 isometric angle which lays up perfectly into pixel
grid of the computer screen.
 |
Note |
|
1:2
means that you draw a line moving two pixels
right and one pixel up. |
|
xOrigin, yOrigin – offset of isometric and cartesian origins in a Flash coordinate system.
x, y, z – isometric coordinates
(black axis in the figure above)
xCart, yCart – cartesian coordinates
xFla, yFla – Flash 2d coordinates
|
|
Note |
|
It is possible to translate coordinates from 3d to 2d only. The other direction doesn’t work because there is a third parameter missing! |
|
Now I will introduce a few functions that will help you draw lines in 3d isometric space. As an homage to the old Amstrad drawing functions, I am going to call two such functions plot and draw.
// --- drawing functions --------------------------------
style = function (a, b, c) {
  // a: line width
  // b: line color
  // c: line alpha
  lineStyle(a, b, c);
};
plot = function (x, y, z) {
  moveTo(xFla(x, y, z), yFla(x, y, z));
};
draw = function (x, y, z) {
  lineTo(xFla(x, y, z), yFla(x, y, z));
};
As you see, these functions use isometric transformations
mentioned before. Now, what is our next step? First, we have to
initialize our application with following parameters:
// --- initialization --------------------------------
xScreenSize = 400;
yScreenSize = 300;
xOrigin = xScreenSize/2;
yOrigin = yScreenSize-30;
With this initialization, we have set the origin of the isometric coordinate system slightly above the centre of the lower edge of the Flash screen.
For our first working example, we will try to draw three different colored lines, representing our three isometric axis.
// red line
style(1, "0xFF0000", 100);
plot(0, 0, 0);
draw(200, 0, 0);
// green line
style(1, "0x00FF00", 100);
plot(0, 0, 0);
draw(0, 200, 0);
// blue line
style(1, "0x0000FF", 100);
plot(0, 0, 0);
draw(0, 0, 200);
[ drawing isometric axis
with "plot" and "draw" functions]
Try to experiment with this functions - you can draw a pretty complex things, such as 3d graphs.
Let's introduce two more new functions. These functions will aid in drawing empty and filled 3d boxes.
|
|
Note |
|
These two new functions work only when all previous functions mentioned in this tutorial are included. |
|
box = function (x, y, z, a, b, c, color) {
  style(1, color, 100);
  plot(x, y, z);
  draw(x+a, y, z);
  draw(x+a, y+b, z);
  draw(x, y+b, z);
  draw(x, y, z);
  plot(x, y+b, z);
  draw(x+a, y+b, z);
  draw(x+a, y+b, z+c);
  draw(x, y+b, z+c);
  draw(x, y+b, z);
  plot(x, y, z);
  draw(x, y+b, z);
  draw(x, y+b, z+c);
  draw(x, y, z+c);
  draw(x, y, z);
};
boxFilled = function (x, y, z, a, b, c, color, fill) {
  beginFill(fill);
  style(1, color, 100);
  plot(x, y, z);
  draw(x+a, y, z);
  draw(x+a, y+b, z);
  draw(x, y+b, z);
  draw(x, y, z);
  plot(x, y+b, z);
  draw(x+a, y+b, z);
  draw(x+a, y+b, z+c);
  draw(x, y+b, z+c);
  draw(x, y+b, z);
  plot(x, y, z);
  draw(x, y+b, z);
  draw(x, y+b, z+c);
  draw(x, y, z+c);
  draw(x, y, z);
  endFill();
};
The parameters are:
x, y, z - box starting
coordinate
a, b, c - box sizes in x, y and z
directions (could be negative)
color - line color
fill - fill color
Let's draw two boxes:
// --- main ------------------------------------------
box(0, 0, 100, 100, 50, 100, "0x00FF00");
boxFilled(100, 0, 0, 100, 50, 100, "0xFFFFFF", "0xAAAAAA");
[ empty and filled box ]
Let's draw something even more complicated:
// --- main ------------------------------------------
// left wall
boxFilled(0, 0, 200, 200, 80, 0, "0xEE0000", "0xAA0000");
// right wall
boxFilled(200, 0, 0, 0, 80, 200, "0xEE0000", "0xAA0000");
// floor
boxFilled(0, 0, 0, 200, 0, 200, "0x00BB00", "0x00BB00");
// left door
boxFilled(80, 0, 200, 40, 60, 0, "0xCCCCCC", "0x999999");
// right door
boxFilled(200, 0, 80, 0, 60, 40, "0xCCCCCC", "0x000000");
// blue box
boxFilled(100, 0, 130, 30, 60, 30, "0x0000FF", "0x0000AA");
// grey box
boxFilled(80, 0, 80, 30, 30, 30, "0xAAAAAA", "0x555555");
// yellow box
boxFilled(60, 0, 70, 20, 20, 20, "0xFFFF00", "0xAAAA00");
// purple box
boxFilled(60, 0, 20, 30, 20, 40, "0xFF00FF", "0xAA00AA");
[ a room full of boxes]
Here's another example of what you can do:
// --- main ------------------------------------------
random_colors = Array("0xFF0000", "0x00FF00", "0x0000FF", "0xFFFF00", "0x00FFFF", "0xFF00FF", "0xFFFFFF");
function draw_chart() {
  for (j=6; j>=0; j--) {
  random_color = random_colors[j];
  for (i=6; i>=0; i--) {
  boxFilled(j*30, 0, i*30, 30, random(10)*10+10, 30, "0x999999", random_color);
  }
  }
}
draw_chart();
[ isometric bar chart - click it ]
As you can see, you can make a pretty good 3d bar chart using these functions.
|
|
Note |
|
On this stage of complexity, you are drawing shapes one on the top of another. Flash automatically puts every other shape on another level. It means that you have to draw further objects first, and closer objects last. |
|
Let's move! We need an object, some controls, and our transformation equations.
step = 2;
// --- initialization of the object-------------------
init = function () {
  this.attachMovie("box", "character", 1000);
};
init();
// --- main ------------------------------------------
character.onEnterFrame = function() {
  this.x += this.dirx*step;
  this.y += this.diry*step;
  this.z += this.dirz*step;
  if (this.x<0) {
  this.x = 0;
  }
  if (this.y<0) {
  this.y = 0;
  }
  if (this.z<0) {
  this.z = 0;
  }
  this._x = xFla(this.x, this.y, this.z);
  this._y = yFla(this.x, this.y, this.z);
};
The object is a movie clip attached from a library. We name
it's instance a "character" and give it some level (1000) - this
is done with init() function.
The buttons are changing the values of X, Y and Z isometric
coordinates. They set dirx,
diry and dirz
properties of the character to values -1,
0 and 1,
using the following action (this is the action added to +X
button):
on (press) {
  _root.character.dirx = 1;
}
on (release, releaseOutside) {
  _root.character.dirx = 0;
}
In the main program loop isometric coordinates are being transformed into plain screen coordinates and the _x and _y properties of the object are set.
In the next tutorial I'll explain performing hit tests without a hitTest function, because obviously we cannot use it for hit testing in isometric projection.
|
|
Recommendation |
|
If you like to explore the theory of arcade games, I recommend an excellent Tile based games tutorial. |
|
Cheers!
 |
Danko DKOZAR.COM |
 |
Just a final word before we wrap up. What you've seen here is freshly baked content without added preservatives, artificial intelligence, ads, and algorithm-driven doodads. A huge thank you to all of you who buy kirupa's books, became a paid subscriber, watch the videos, and/or interact on the forums.
Your support keeps this site going! 😇

:: Copyright KIRUPA 2026 //--
