 Create
a Photo
Gallery
code by sbeener :: tutorial by kirupa chinnathambi
One thing that I have always been thankful
for was the great people who help keep the site's content
fresh and engaging. More often than not, I have often been
inspired to write a tutorial based on a user's post on the
forum. This tutorial is no exception. This tutorial would
not be possible without the help of the great moderator
sbeener (suprabeener in the old forums). He was more than
kind enough to share a more efficient version of a photo
gallery that I created, and his version is what you will be
duly pleased with at the end of completing this tutorial.
Use your arrow keys or press the green left
and right arrows in the following animation to navigate
through the photo gallery:
[ use your arrow keys or click
on the green arrows to move through the gallery]
You will create something similar to the
above animation in a short while.
Creating a Photo Gallery:
-
Create a new movie in Flash
MX. Set the width and height to anything you want.
-
Now, draw a rectangle the size of the images you will
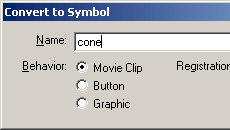
load and make it a movie clip. To convert
something into a movie clip, select it and press F8. From
the Convert to Symbol Dialog box that appears, select the
Movie Clip option and press OK:

[ the
convert to symbol dialog box ]
-
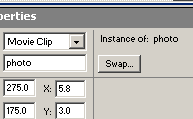
Once you have created your movie clip, select the movie
clip with your mouse pointer. The Properties panel will
display. Give the movie clip the instance name photo:

[ give the
mc the name 'photo' in the instance panel ]
-
After you have done that, insert a new layer on your
timeline. Right click on the blank keyframe on the new layer
and select Actions. The Actions dialog box will appear.
Copy and paste the following code:
[ add the
above lines of code to the empty keyframe ]
-
Would you believe me if I told you that you are done? You
are, but to make it work, read on for customizing the photo
gallery with your own images, image paths, etc.
Customizing the Photo Gallery Code
Now here comes the relatively simple part of
customizing the code to work with your own pictures to make
your photo gallery something more meaningful than 10
pictures of wildlife I found over at the National Geographic
site. Make sure your Actions dialog box is displayed with
the code you pasted and read on!
More than likely, you have your images
stored in a certain location on your Web site or on your
hard drive that is different from where your Flash animation
is stored.
Find the first line of code (it is a
variable actually) that says: this.pathToPics. Modify
the path set by the aforementioned variable to the folder
containing your images. For example, in the version of the
code in the tutorial, the images are stored in the
animation folder. Therefore, the variables
pathToPics equals "animation/". If your images are stored in
the SAME directory as your animation, simply make pathToPics
equal "" as in:
this.pathToPics =
"animation/";
Other examples of how you can modify the
code include:
this.pathToPics =
"../animation/";
this.pathToPics =
"http://www.kirupa.com/pics/";
Now, you get the chance to specify the
file name for the images that will be used! Find the line
that says this.pArray. Replace all the image names I
have written with the images that you will use instead. If
you have more images than spaces provided, simply add more
image names by adding a comma with the image name in
quotation marks.
The code for just two images would be:
this.pArray = ["flash.jpg",
"windows.jpg"];
Again, you can have as many or as few
images in the photo gallery. The code that sbeener wrote is
intelligent enough to count the number of images you specify
in the pArray variable and customize the gallery
accordingly.
You are done with customizing the code and
this tutorial (for the second time). Preview the animation
and see how it works. If you are good with ActionScript, you
can tweak the code with a few modifications of your own.
Creating the Back and Forward Buttons
You have finished everything except the Back
and Forward buttons. While this is optional, it is always
nice to provide users a way of navigating your photo gallery
without having to use the back and forward keys. To create
the back and forward buttons, try the following steps:
-
Draw the arrows or text that
you choose to use for the back and forward buttons.
-
Select a button and press F8. From the Convert to
Symbol dialog box, select Button and press OK. Repeat this
step for the other button.
-
Right click on the button for "back" and select Actions.
Add the following line of code:
-
Similarly, right click on the button for "forward" and
select Actions. Add the following line of code:
Rejoice! You have just completed your
photo gallery tutorial (again) with the next and forward
buttons.
|
 |
the loaded
images look disproportionate |
You load your image
and everything seems to be scaled oddly. This will
happen if you resize your movie clip any. When you
load the JPG file, it will scale automatically to
fit the size of your movie clip. If your movie clip
has a width of 105% and a height of 110%, your JPG
would scale accordingly to produce a slightly
distorted version of the original image. Here is how
to fix it:
-
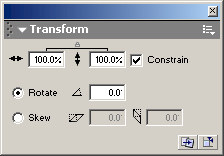
Right click on the movie clip and select Panels |
Transform.
-
In the Width and Height fields, enter a 100 for
100%:

-
Once you enter a 100 for both the width and height
fields, your movie clip will be properly sized but
not be the size you want it to be. So,
right click on the movie and select Edit in
Place.
-
Now, resize the movie according to what you want
it to be. Note that you are resizing the actual
"stuff" that makes up the movie clip instead of
the movie clip directly (which is you selected
Edit in Place).
-
Now, no distortion....only great images!
|
|
The above note concluded this tutorial. If
you get a chance, drop by the forums (http://www.kirupaforum.com)
and thank sbeener for the great code. If you are
interested in viewing my FLA with the images, click the
download FLA link below:
Just a final word before we wrap up. What you've seen here is freshly baked content without added preservatives, artificial intelligence, ads, and algorithm-driven doodads. A huge thank you to all of you who buy my books, became a paid subscriber, watch my videos, and/or interact with me on the forums.
Your support keeps this site going! 😇

|