


This is an archived tutorial from the kirupa.com legacy collection. It covers software that may no longer be available, but it is kept online because the ideas still hold up.
A popular tutorial on this site is the Photo Gallery using XML and Flash tutorial. As time went on, the forums were filled with requests to make modifications to the tutorial. In this tutorial, I will address several of the more common requests I noticed. The modifications I explain in this tutorial are:
You can now see and cycle through smaller images that offer a preview of the larger image.
Valuable CPU resources were being used up even when the photo gallery wasn't doing anything. In this version, onEnterFrame calls are removed when not in use.
The following is an example of the modified photo gallery tutorial:
[ use your arrow keys or press the Next and Previous buttons ]
 |
NOTE |
| This tutorial is a modification over the original Photo Gallery tutorial. If you have not finished that, you may be a bit lost in this tutorial, for I will not be repeating concepts already covered in the previous tutorial | |
Let's first discuss how we are going to approach implementing
thumbnails into Flash.
The obvious first step, is to procure the smaller images that
will make up our thumbnails. Ideally, you would want your
thumbnail images to be considerably smaller than your main
images. If your images are too large, it defeats the purpose of
having a quick-loading preview of all the images.
Next, we need to find a way of displaying our thumbnails. There are two popular ways you can choose to display thumbnails: the grid and scroller.
The grid is where all of the thumbnail images are displayed in, surprise surprise!, a grid:

[ the grid ]
The scroller, similar to what you see in the above animation, is the method where you scroll through a row of images:

[ the scroller ]
I prefer the scroller simply because the thumbnail images I'm using are a bit too large to efficiently fit in a small area. Because I am going to be using a scroller, I need to figure out an efficient way of scrolling the images and stopping the scrolling if there are no images left to be scrolled or your mouse cursor is not over the thumbnail area.
Finally, and most importantly, the thumbnail data will need to be taken from an XML file. That means we need to make our thumbnail code expandable so that, even if you use some images that are oddly sized, your photo gallery adapts to it nicely. We don't want to mess with our FLA a whole lot!
Now that we have a better idea of how to approach the thumbnails, let's start creating them in Flash. Onwards to the next section!
If you arrived here without having read the previous section, please go back to the previous section to get filled up on what to expect on this page!
Since our thumbnail graphics will be loaded from an XML file, we need to modify our XML data to incorporate the thumbnails. In our original photo gallery, the XML file had the following structure:
					<pic>

  <image>Path

  to Image</image>

  <caption>Image

  Caption</caption>

  </pic>

  <pic>

  <image>Path

  to Image</image>

  <caption>Image

  Caption</caption>

  </pic>
Let's modify the structure by adding a node for thumbnails:
					<pic>

  <image>Path to Image</image>

  <caption>Image Caption</caption>

  <thumbnail>Path

  to Thumbnail</thumbnail>

  </pic>

  <pic>

  <image>Path to Image</image>

  <caption>Image Caption</caption>

  <thumbnail>Path

  to Thumbnail</thumbnail>

  </pic>
For the sake of simplicity, I have already created the thumbnail images and uploaded them for you to use. In your folder containing all of your photo gallery files, create a new file called images.xml with the following information:
The above XML data is very similar to the file you already have seen from the photo gallery, but it includes some extra children for thumbnails.
Now, I have provided a sample FLA for you to download and use. Click the following link to download it:
From the zip file you downloaded above, extract the FLA to the same location as your images.xml file, and then open the file thumbnail_initial.fla. You will notice that this FLA is very similar if you have used the photo gallery tutorial. In fact, it is the exact same FLA with the exception of the extra space below the text fields:

If you were to test your animation right now, provided images.xml is in the same directory as the FLA, you will see a functioning version of the photo gallery you had worked on earlier.
So, let's extend this photo gallery with thumbnails. The next section will get you started!
Make sure you have your FLA opened and ready. Let's start the modifications:

[ click the Scene 1 tab ]

[ drag and drop the thumbnailMC symbol from the library to your stage ]

[ where your empty thumbnailMC movie clip will be - x: 22, y: 289 ]

[ draw a vertical rectangle to help specify the boundaries of your movie ]

[ the boundary clip and its copy on the right ]

[ notice how the images appear beyond the boundaries ]

[ insert a layer above your thumbnail layer and draw a large rectangle ]

[ select both the boundary movie clips and set their alphas to 0 ]
While you have gotten your thumbnails to display, we haven't reached the most important part of this tutorial - the part where I explain what part the 17 or so steps and the code have in order to create this cool and useful effect.
So, let's head on to the next section!
You just survived a painstaking page of getting the thumbnails to work from the previous section, but how did all of those various steps combine into getting our thumbnails to work? Hopefully, this page will answer that and more!
First, let's take a look at out the movie clips and shapes we added for our photo gallery modification. The following image (color/opacity added for emphasis) provides details on the symbols I will be discussing:
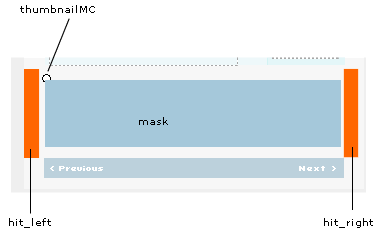
As you recall from the first page, the thumbnails were constrained by boundaries on both the left and right sides. Those boundaries are determined, not by the hit_left and hit_right, but primarily by the mask rectangle shape colored blue in the above image.
Note that the thumbnails are all loaded into the thumbnailMC movie clip, masking the movie clip with the giant rectangle ensured that the contents of thumbnailMC, the thumbnail images, would not be visible unless they were within the boundaries of the mask rectangle.
So, what role do hit_left and hit_right play? They tell Flash where the boundaries are for determining whether the row of thumbnails have actually reached their left or right boundaries. While the mask rectangle ensured that you only saw thumbnails within the boundary specified by the mask, the hit_left and hit_right movie clips help Flash to make sure that you don't overscroll in either the left or right directions. The scrolling should stop when the last thumbnail crosses the hit_right movieclip or when the first thumbnail is to the left of the hit_left movie clip.
I can't elaborate more on the function of hit_left and hit_right without taking look at the code. Most of the code should be familiar to you from the photo gallery tutorial, so I'll only elaborate on the code that is new to what we are doing now.
Let's take a look at the first section code:
function loadXML(loaded) {
  if (loaded) {
  xmlNode = this.firstChild;
  image = [];
  description = [];
  thumbnails = [];
  total = xmlNode.childNodes.length;
  for (i=0; i<total; i++) {
  image[i] = xmlNode.childNodes[i].childNodes[0].firstChild.nodeValue;
  description[i] = xmlNode.childNodes[i].childNodes[1].firstChild.nodeValue;
  thumbnails[i] = xmlNode.childNodes[i].childNodes[2].firstChild.nodeValue;
  thumbnails_fn(i);
  }
  firstImage();
  } else {
  content = "file not loaded!";
  }
}
In the above section of code, the data from the XML file is formatted and stored in various arrays. You can see how that is done in great detail here: http://www.kirupa.com/developer/mx2004/xml_flash_photogallery4.htm
thumbnails = [];In this line of code, I am initializing a new variable called thumbnails that will act as an array.
thumbnails[i] = xmlNode.childNodes[i].childNodes[2].firstChild.nodeValue;
thumbnails_fn(i);
The above two lines (three if count the break caused by the formatting) are contained in the for loop that goes through each line of your XML file and assigns that data to the appropriate variables.
The thumbnail data is the third element in the i-th node. Recall that the numbering for positions in an XML file starts at 0, so the third element would be represented by a 2 - hence, childNodes[2].
Each thumbnail element is itself a child of a larger node, and that node is accessed by childNodes[i], and i is a variable that runs between 0 and the total number of nodes in our XML file. All of that data, is stored in our thumbnails array which we initialized just a few lines ago!
Finally, I make a call to a function called thumbnails_fn. I also pass the variable i to the thumbnails_fn function. Let's talk about the thumbnails_fn function in the next section!
The code in the previous section was just a setup to the real code that is, coincidentally, on this page. Let's take a look at the thumbnails_fn function that I briefly mentioned towards the end of the previous section:
Before I go over each line of the code, let me briefly summarize what this function does. This function takes in a number, k, as an argument from the loadXML function. This number determines which image is being loaded, and this function is only active while the for loop in the loadXML function is still looping.
In that brief period of time, this function creates a new movie clip for each new value of k that is passed to it, and each new movie clip acts as a holder for each thumbnail image. After each image is loaded, we then give it the onRollOver and onRelease properties so that people can click on each image and have it's larger counterpart be loaded in the top frame.
Let's dissect this code:
thumbnail_mc.createEmptyMovieClip("t"+k, thumbnail_mc.getNextHighestDepth());I am creating a new empty movieclip called ("t"+k), inside the movie clip thumbnail_mc. In order to do that, I'm using the createEmptyMovieClip function that takes in the arguments for instance name and depth provided I call the function from the target movie clip: thumbnail_mc.
For example, movie clips created will be called t0, t1, t2,...., tn where n is the value for k. Speaking of k, it is the value that is passed to the thumbnails_fn function from the loadXML function. More specifically, k is similar to the variable p that is used throughout the photo gallery code.
Notice also that I don't give an arbitrary value for the depth, but instead use the getNextHighestDepth() function to ensure that each movie clip created into thumbnail_mc has a different depth.
tlistener = new Object();This line is fairly straightforward. I simply declare the tlistener variable as an object. No tricky alternative meanings here.....I hope!
image_mcl = new MovieClipLoader();
image_mcl.addListener(tlistener);
image_mcl.loadClip(thumbnails[k], "thumbnail_mc.t"+k);
Let's jump a number of lines down and look at the last three lines. This and the above tlistener definition are part of the functioning for the MovieClipLoader() class that I assign to the variable image_mcl.
Instead of explaining this, Macromedia's documentation for the MovieClipLoader along with loadClip does a brilliant job of explaining this. They even provide a good example. Therefore, I will skip explaining the technical functioning of this function.
Before I leave, take note that thumbnail[k] references the thumbnail array, and combined with the index position k, returns the path to the image that needs to be loaded. The same path that we earlier defined in our XML file.
tlistener.onLoadInit = function(target_mc) {If you recall, tlistener is the variable that I declared as an object earlier. Under the MovieClipLoader class, tlistener is used to gauge the progress of the loaded images, and if the image has both loaded AND initialized, any code contained here is executed.
One last feature is that this function takes in the argument
target_mc, which is passed to it from the loadClip method:
"thumbnail_mc.t"+k,
of course, k is replaced with a number referencing the index
position of your array.
target_mc._x = hit_left._x+(target_mc._width+5)*k;This line is responsible for placing each thumbnail in the row format. Surprisingly, all of the above produces a simple number - the x position of a particular thumbnail.
hit_left._x returns the x position of the hit_left movie clip. This produces an offset so that your thumbnails don't load at the very left-most boundary of your movie. You could simply use a number such as 10 or 20 to produce the necessary offset, but if you were to vary your thumbnail gallery beyond what I created, then you'll have to go back and change the numbers manually. In this case, simply moving the hit_left movieclip to accommodate a different photo gallery will automatically adjust the positioning of the thumbnails also.
(target_mc._width+5)*k is the line that positions each thumbnail relative to the preceding thumbnail. I offset the position of each future thumbnail by the width of the current thumbnail. The value of k places each thumbnail far away so that you don't overlap an existing thumbnail. The value, 5, is simply the spacing between each thumbnail, so you have a small gap between each image.
target_mc.pictureValue = k;I am assigning the value k to a variable pictureValue in our target_mc movie clip. Remember that target_mc varies depending on the value of k in the loadClip action. This is a very effective way of assigning a variable to a movieclip that you can easily access later without worrying about variable scope and other fun issues that I won't address at this time!
target_mc.onRelease = function() {
  p = this.pictureValue-1;
  nextImage();
};
target_mc.onRollOver = function() {
  this._alpha = 50;
  thumbNailScroller();
};
target_mc.onRollOut = function() {
  this._alpha = 100;
};
In these series of lines, I give each thumbnail the ability to execute some code when clicked on or rolled over/out.
The code for onRelease is similar to pressing the Previous and Next buttons in the photo gallery. The only difference is that the number p varies, for you may skip over a few images when clicking on an image to load after all. So, we need to determine the value of p for each image. Luckily, if you remember, I assigned each movie clip the value of k in the pictureValue variable, and k is the variable p in disguise for this function!
For the onRollOver action, I set the alpha of the thumbnail to 50. There is no real reason behind me doing that besides informing the users that rolling over the thumbnail does something similar to a button. I also call the thumbNailScroller() function, and you will learn more about that later.
When you roll out of the thumbnail, I return the alpha of the movie clip back to 100. I'm trying to simulate the Over and Default states of a button with this movie clip.
Alright, we are almost done. Let's now take a look at our thumbNailScroller_fn function that moves the thumbnails left and right depending on where your mouse cursor is. Onwards to the next section!
The code in the previous section was just a setup to the real code that is, coincidentally, on this page. Let's take a look at the thumbnails_fn function that I briefly mentioned towards the end of the previous section:
Before going through the code line-by-line, let me explain what this function does. The thumbNailScroller function, as its name implies, helps scroll the thumbnails when the mouse moves over the left or right boundaries. Most of the above code lies in determining when to start and stop the scrolling:
this.createEmptyMovieClip("tscroller", 1000);I'm creating a new, empty movie clip called tscroller at a depth of 1000.
scroll_speed = 10;The variable scroll_speed controls how fast all of the thumbnails scroll left or right.
tscroller.onEnterFrame = function() {I'm specifying the onEnterFrame of the newly created tscroller movie clip. If you recall, onEnterFrame executes any code contained within it repeatedly unless you explicitly delete the onEnterFrame.
if ((_root._ymouse>=thumbnail_mc._y) && (_root._ymouse<=thumbnail_mc._y+thumbnail_mc._height)) {The above if condition checks to make sure that the thumbnail scroller works only when our mouse is contained within the vertical (y) constraints of the thumbnail_mc movie clip.
The following diagram shows the constraint imposed by _root._ymouse >= thumbnail_mc._y. Anything beyond the top border of the thumbnail is fair game:

But, I also include an extra constraint to make sure that the thumbnails don't scroll when your mouse is below the thumbnail such as the Previous and Next buttons. That is fixed by the _root._ymouse<=thumbnail_mc._y+thumbnail_mc._height code.
Thumbnail_mc._y gives the numerical value of the top border of your thumbnails, and thumbnail_mc._height gives you the total height of your thumbnails. The total y position then, is the sum of both the y position of the top thumbnail border and the total thumbnail height.

Each of the above two constraints by themselves are not very practical. But, both of them combined with the && operator produces just the right vertical boundary I need, as seen by the combination of the blue and yellow rectangles as the green rectangle shown below:

The next course of action would be to limit the horizontal range of movement. You wouldn't want to have the thumbnails scroll when your mouse cursor is well to the left or right of the actual photo gallery area!
The right boundary of our horizontal scrolling is determined by:
(_root._xmouse>=(hit_right._x-40)) && (thumbnail_mc.hitTest(hit_right))I check for two things. First, I check to see if the mouse cursor is 40 pixels to the left of the right-most boundary of our hit_right movie clip.
Second, I make sure that the thumbnail_mc movie clip is hitting hit_right. Even though, due to the mask, it looks as if all of the thumbnails are neatly contained within the viewing area, in reality, the thumbnails extend well towards the right-end of the screen provided there are enough images.
The hitTest makes sure that the thumbnail_mc still is hitting the hit_right movie clip. In other words, it makes sure there are still images left for us to scroll. I wouldn't want you to keep scrolling indefinitely after all of the thumbnails have left the viewing area!
The complement of this is the boundary for the left side of our thumbnail scroller:
(_root._xmouse<=(hit_left._x+40)) && (thumbnail_mc.hitTest(hit_left))I do the same thing as I did for the right boundary, except I change a few signs and movie clip references. Like before, I check to make sure that the mouse is within a reasonable area on the left side before the scrolling is invoked, and I also make sure that there are images left to scroll by using the hitTest function.
thumbnail_mc._x -= scroll_speed;If both the vertical and horizontal right boundary conditions are met, that means we are interested in scrolling our images to the left. Therefore, I have the code set to move thumbnail_mc in the horizontal direction at a speed determined by the scroll_speed variable.
thumbnail_mc._x += scroll_speed;Likewise, if both the vertical and horizontal left boundary conditions are met, I scroll the thumbnail_mc movie clip to the right at the speed determined by scroll_speed.
if ((_root._ymouse>=thumbnail_mc._y) && (_root._ymouse<=thumbnail_mc._y+thumbnail_mc._height)) {
  if ((_root._xmouse>=(hit_right._x-40)) && (thumbnail_mc.hitTest(hit_right))) {
  thumbnail_mc._x -= scroll_speed;
  } else if ((_root._xmouse<=(hit_left._x+40)) && (thumbnail_mc.hitTest(hit_left))) {
  thumbnail_mc._x += scroll_speed;
  }
} else {
  delete tscroller.onEnterFrame;
}
The structure of this if statement is something that I have not used in any of my tutorials before. It is an if - else if form. Normally, there would be an if statement and an else statement, but I wanted to have one extra condition for executing code.
This is a nicer way of combining to if statements together, and you would suffer no loss in functionality if you decided to use two if statements instead.
delete tscroller.onEnterFrame;I check to see if the mouse cursor is within the vertical area of the thumbnail, and if the mouse cursor is not there, that means that the user has scrolled and moved his/her mouse cursor away from the scrolling area.
Since having onEnterFrame loop continuously can be taxing on the CPU, it is good to delete them. Since our thumbNailScroller() function is called each time you hover over a thumbnail, a new empty 'tscroller' movie clip is created with a new onEnterFrame also being initiated. In other words, the deletion is only in effect until you call the thumbNailScroller() function again.
In the next section, I will do a lightning round summary of the six pages you've clobbered through already!
I will now provide a quick summary of everything in our thumbnail code, from the previous sections, and what causes it to work.
First, you decide that you want to have thumbnails. You make the necessary modifications to the XML file by adding in the path for your thumbnail images. Now that you have your XML file modified, your next course of action is to modify the loadXML function in your FLA. You tell Flash to loop through each node and pick out the thumbnail image path and store it in an array.
So, now, you have reached a point where data from XML has been retrieved, processed, and stored as an array in Flash. What do you do with an array full of thumbnail image paths? You create an empty movie clip for each thumbnail and load that thumbnail into it!
Loading the thumbnail is only one part of our whole thumbnail scroller. You have to make sure that each image is spaced accordingly by taking into account each image's width and not loading the next successive image on top of a previous image! That is where our hit_left and hit_right movie clips first gain importance.
The second part of the thumbnail scroller is to actually scroll when our mouse is on the left or right edges of our thumbnail. In this tutorial, I used the two movie clips, hit_left and hit_right to simulate the left and right boundaries of our thumbnail scroller. If the mouse was both within the thumbnail area and touching either the left or right hit movie clips, your thumbnails will scroll provided there are thumbnails left to scroll.
Since most of the code is based on the existing photo gallery code, it was not difficult to load the larger image when a thumbnail is clicked. Each thumbnail contained a number that was equivalent to a number used in loading images in the photo gallery. Passing that number to our existing functions from our photo gallery was all it took to getting images to load.
I have provided a ZIP file containing both our final thumbnail FLA and the modified images.xml file.
A great big thanks go out to all of the members who constantly helped others with their thumbnail and photo gallery questions on the forums. I'm sure there are more members, but the ones I've seen helping answer these questions often are scotty, stringy, senocular, lostinbeta, claudio, and more!
 |
Just a final word before we wrap up. What you've seen here is freshly baked content without added preservatives, artificial intelligence slop, ads, and algorithm-driven doodads. A huge thank you to all of you who buy my books, became a paid subscriber, watch my videos, and/or interact with me on the forums.
Your support keeps this site going! 😇


:: Copyright KIRUPA 2026 //--
