 Tutorials
Books
Videos
Forums
Tutorials
Books
Videos
Forums


This is an archived tutorial from the kirupa.com legacy collection. It covers software that may no longer be available, but it is kept online because the ideas still hold up.
It is time for another photo gallery tutorial! This one is a little more advanced than the other photo gallery tutorial on this site. So, now, what would make me write another tutorial on a topic that has already been covered? The answer is easier maintenance! In the earlier photo gallery tutorial, if you wanted to add an extra image, you had to manually edit the FLA file and add the image's name to the array. That usually requires a few more steps such as uploading a new SWF and a possible renaming the file and embed paths to avoid browser caching.
In this version, if you want to add another image to your photo gallery, all you have to do is edit an XML file. Your photo gallery automatically incorporates your addition without you having to even touch the FLA. In the long run, you may find that the time you save in adding or editing existing images is worth more than your time in going through this tutorial. Plus, this version of the tutorial accommodates captions for your images. Everybody loves captions!
The following animation is an example of a photo gallery that you will create towards the end of this tutorial:
[ use your arrow keys or press the Next and Previous buttons ]
 |
NOTE |
|
If you cannot see any images
above, make sure, in your URL, you have www
preceding kirupa.com. The full URL for this
tutorial should be:
http://www.kirupa.com/developer/mx2004/xml_flash_photogallery.htm The reason is, I believe, due to XML's security features that think kirupa.com is a different domain from www.kirupa.com. |
|
The XML file for the above photo gallery that contains the image and caption data can be found here.
While I will explain the coding behind the photo gallery, you should familiarize yourself with some of the basics of XML and XML in Flash. If you are new to XML and XML's use in Flash, the following links should help you:
Let's first create the XML file. I will cover the basics of an XML file later on in this tutorial.
The following steps will explain how to create the XML file for this tutorial:
Launch a program capable of editing plain-text, ASCII formatted text such as Notepad.
In Notepad (or equivalent program) copy and paste the following code:
[ copy and paste the above code in Notepad ]
The stuff you pasted may look a little odd, but don't worry about it right now. Just make sure you copy and paste the above into your text editor (Notepad, etc.)
Save this file as images.xml. Don't forget where you saved this file, for you will need to save your Flash file in this location also.
Normally, I would have you create your own Flash file. I am going to make an exception in this case and have you download the partial FLA with all of the interface elements created for you.
Click on the following link to download the file:
Once you have downloaded the FLA from the above link, make sure you unzip it to the same location as your newly created images.xml file.
|
|
Inside the Mind of Kirupa |
|
There is a reason
behind why I am making you download the partial
FLA as opposed to giving you directions to
create the animation on your own. No, it's not
because I am lazy...not entirely! The reason is
that most of the actual Flash work that I would
have you do would involve simply creating the
interface.
Instead of spending time on having you create the interface, I would rather have you understand the important coding elements behind the animation. If you take a look at the FLA, you will see that none of the REAL work has been done for you. I will explain in the following sections how to convert the skeleton of your photo gallery into a fully functional, beastly creature capable of dishing out photos at your request. |
|
In the next section, I will explain the code you will need to add, and I will also explain the modifications you will need to make to your Flash animation.
This is page two of this tutorial, so if you stumbled here without having completed the previous section, click here to catch up on all the exciting stuff that you missed in the previous section.
Make sure you have opened the FLA file you downloaded in the previous section. Now, you should see the following six objects:
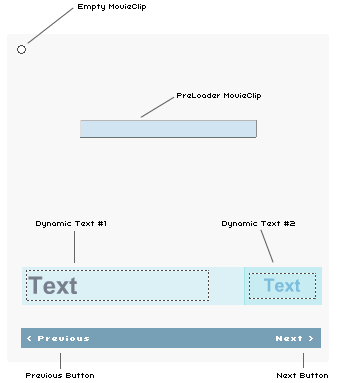
Your task is to assign each of those six objects an instance name. I will explain how to add an instance name to one object first, and you should be able to apply an instance name to all of the other objects.
Select the Empty Movie Clip with your mouse pointer.
Look towards the bottom-left of your screen in the Properties panel. Find the text field that says < Instance Name >:
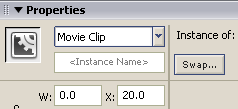
[ the <Instance Name> text field ]
Click on the < Instance Name > text field and enter the word picture.
You have successfully given your empty movie clip the Instance Name picture. Now, you will need to repeat the above steps for the 5 remaining objects.
The following list...lists the object and the instance name I want you to give that object.:
Empty Movie Clip = picture (already done)
Preloader Movie Clip = preloader
Dynamic Text #1 = desc_txt
Dynamic Text #2 = pos_txt
Previous Button = previous_btn
Next Button = next_btn
If you don't know which object corresponds to the instance name, check the image towards the top of this page. Now, all of your objects have an instance name associated with them. The last thing that remains is for you to add the code.
Select the empty keyframe in your Actions layer. Press F9 to display your Actions panel. Copy and paste all of the following code into your Actions panel:
function loadXML(loaded) {
  if (loaded) {
  xmlNode = this.firstChild;
  image = [];
  description = [];
  total = xmlNode.childNodes.length;
  for (i=0; i<total; i++) {
  image[i] = xmlNode.childNodes[i].childNodes[0].firstChild.nodeValue;
  description[i] = xmlNode.childNodes[i].childNodes[1].firstChild.nodeValue;
  }
  firstImage();
  } else {
  content = "file not loaded!";
  }
}
xmlData = new XML();
xmlData.ignoreWhite = true;
xmlData.onLoad = loadXML;
xmlData.load("images.xml");
/////////////////////////////////////
listen = new Object();
listen.onKeyDown = function() {
  if (Key.getCode() == Key.LEFT) {
  prevImage();
  } else if (Key.getCode() == Key.RIGHT) {
  nextImage();
  }
};
Key.addListener(listen);
previous_btn.onRelease = function() {
  prevImage();
};
next_btn.onRelease = function() {
  nextImage();
};
/////////////////////////////////////
p = 0;
this.onEnterFrame = function() {
  filesize = picture.getBytesTotal();
  loaded = picture.getBytesLoaded();
  preloader._visible = true;
  if (loaded != filesize) {
  preloader.preload_bar._xscale = 100*loaded/filesize;
  } else {
  preloader._visible = false;
  if (picture._alpha<100) {
  picture._alpha += 10;
  }
  }
};
function nextImage() {
  if (p<(total-1)) {
  p++;
  if (loaded == filesize) {
  picture._alpha = 0;
  picture.loadMovie(image[p], 1);
  desc_txt.text = description[p];
  picture_num();
  }
  }
}
function prevImage() {
  if (p>0) {
  p--;
  picture._alpha = 0;
  picture.loadMovie(image[p], 1);
  desc_txt.text = description[p];
  picture_num();
  }
}
function firstImage() {
  if (loaded == filesize) {
  picture._alpha = 0;
  picture.loadMovie(image[0], 1);
  desc_txt.text = description[0];
  picture_num();
  }
}
function picture_num() {
  current_pos = p+1;
  pos_txt.text = current_pos+" / "+total;
}
Now, save this file. Go to File | Publish Preview | HTML. You will now see a working example of a photo gallery! In the next section I will explain how to add new images, remove existing images, etc.
In case you are wondering, don't worry! I will try to explain every line of code that you pasted above later.
This is page three of this tutorial, so if you stumbled here without having completed the previous section, click here to catch up on all the exciting stuff that you missed in the previous section.
Like I mentioned in the first page, editing your photo gallery is fairly simple. All you have to do is modify your XML file. I have provided a brief guide outlining what you will need to do in order to edit/add/remove images and related data from your XML file.
Editing Existing Images
I am fairly certain that you would like to populate your photo gallery with your own pictures. In order to do that, open your images.xml file in a text editor.
You should see rows of text something similar to the following:
					<pic>

  <image>Path to

  Image</image>

  <caption>Image

  Caption</caption>

  </pic>

  <pic>

  <image>Path to

  Image</image>

  <caption>Image

  Caption</caption>

  </pic>
You can replace the path for my images to that of yours. Your path can be an absolute path or a relative path. You should be aware that the relative path is relative to where your SWF file is. It is not relative to where your XML file is.
You can also change the text in the <caption> element to something more representative of your image. If you want to write more than a few words of text, you should consider altering the dynamic text field in your Flash file.
Removing Images
If you want to remove an image, simply delete the entire <pic> node that corresponds to your image. For example, let's say you wanted to remove Image1 from the following list:
					<images>

  <pic>

  <image>Image1</image>

  <caption>The

  first image!</caption>

  </pic>

  <pic>

  <image>Image2</image>

  <caption>The

  second image</caption>

  </pic>

  </images>
You would delete the <pic> node corresponding to displaying Image1. Your XML file will look like the following after your deleting operation:
					<images>

  <pic>

  <image>Image2</image>

  <caption>The

  second image</caption>

  </pic>

  </images>
Note that all that now remains is just the <pic> node for Image2. I even removed the actual <pic> and </pic> text along with the <image> and <caption> text that corresponds to Image1.
Adding Images
If you want to add new images to your photo gallery, simply add the following text inside your <images> node:
					<pic>

  <image>Path to

  Image</image>

  <caption>Image

  Caption</caption>

  </pic>
You can place the above text anywhere inside your <images> node, but do not accidentally place it inside a <pic> node. <pic> is a child of the <images> node, but the Flash code is not setup in its current form to read a <pic> node that is a child of another <pic> node.
A quick way to check is to see if your XML file content's spacing is consistent. As long as you don't see any odd gaps or spacing miscues, you should be fine!
As you saw above, most of the routine changes you would likely apply to your photo gallery can be done by modifying your XML file itself. You don't even need to bother with the FLA file. With that said, some of the changes you will make to your FLA file. You cannot control the font size, font color, location your images are placed in, and more only within the FLA file.
In the next section, I will start to explain the code that makes the photo gallery work. The most immediate portion of the tutorial required to get the photo gallery working is over, but I really do hope you stick around for the code explanation.
If you don't feel like sticking around, here are the source files:
It is my strong belief that after you understand the coding aspect of the photo gallery, you will be better able to create and modify my basic photo gallery implementation into newer, more creative ways.
This is page four of this tutorial, so if you stumbled here without having completed the previous section, click here to catch up on all the exciting stuff that you missed in the previous section. If you haven't even started this tutorial, then head on over to the first page. I'll be waiting here until you finish.
I will break the code down into sections so you can get a better understanding of how each section of code contributes to the whole photo gallery.
Let's start at the top and move down. The code for loading your XML file is the following:
function loadXML(loaded) {
  if (loaded) {
  xmlNode = this.firstChild;
  image = [];
  description = [];
  total = xmlNode.childNodes.length;
  for (i=0; i<total; i++) {
  image[i] = xmlNode.childNodes[i].childNodes[0].firstChild.nodeValue;
  description[i] = xmlNode.childNodes[i].childNodes[1].firstChild.nodeValue;
  }
  firstImage();
  } else {
  trace("file not loaded!");
  }
}
xmlData = new XML();
xmlData.ignoreWhite = true;
xmlData.onLoad = loadXML;
xmlData.load("images.xml");
The above colored text is what we will be focusing on right now. I'm going to borrowing a lot of the following information from the Displaying XML in Flash tutorial I wrote earlier:
The following sections will explain each line of code:
xmlData = new XML();Here you assign a variable to the new XML object. The XML object in Flash contains all of the nifty XML features and properties that greatly simplify displaying and modifying XML data in your Flash animation. I am calling my XML object xmlData.
xmlData.ignoreWhite = true;When Flash reads an XML file, it reads all the spacing contained in the XML file also. You should almost always use this line to tell Flash to ignore the white spaces such as empty text nodes. Note that the .ignoreWhite property is a part of the xmlData object you declared in the previous line.
If you are using Flash MX or higher, which you really should for better XML support, you do not need to have this line here. Thanks to mdipi for pointing that out.
xmlData.onLoad = loadXML;When you are dealing with XML data in Flash, a common mistake is to assume that the XML file is loaded almost immediately. For large XML files, or even smaller XML files over a slow connection, that is hardly the case. Therefore, it is good to create your own event handler to ensure that your XML file is loaded.
In this line, I am telling xmlData to invoke the loadXML function when loaded - hence the onLoad. I will explain in greater detail about the loadXML function a few lines down from here.
xmlData.load("images.xml");In this line I specify the path to the XML file that I am interested in loading. Since we saved our FLA file into the same directory as our images.xml file, I simply specify the name of the file. You can add relative paths if your XML file happens to be in a different location.
function loadXML(loaded) {
  if (loaded) {
  xmlNode = this.firstChild;
  image = [];
  description = [];
  total = xmlNode.childNodes.length;
  for (i=0; i<total; i++) {
  image[i] = xmlNode.childNodes[i].childNodes[0].firstChild.nodeValue;
  description[i] = xmlNode.childNodes[i].childNodes[1].firstChild.nodeValue;
  }
  firstImage();
  } else {
  trace("file not loaded!");
  }
}
This if statement checks to see if the file is loaded. If the file is not loaded, the code under the "else" section is activated. I have it set to display "file not loaded!" in the output window when previewed in Flash.
Before explaining what the grayed out code does, I think now is a good time for me to explain the XML file and how it is structured. Your XML data closely follows the sample XML data written below:
					<images>

  <pic>

  <image>Image1</image>

  <caption>The

  first image!</caption>

  </pic>

  <pic>

  <image>Image2</image>

  <caption>The

  second image</caption>

  </pic>

  </images>
What you need to understand is the parent-element/node relationships from the above example. I provide, in my view, a good read about that topic here under the section labeled "The XML File", so I will only briefly summarize.
In our XML file, the most fundamental level is the images node. Contained within the images node are the childNodes called pic. The childNodes pic contain the nodes image and caption which actually contain the data.
In this page we learned how to load the XML file into Flash, and we also got a brief glimpse at the structure of the XML file. There is more coding that has been uncharted, but thankfully, there is a next section!
This is page five of this tutorial, so if you stumbled here without having completed the previous section, click here to catch up on all the exciting stuff that you missed in the previous section. If you haven't even started this tutorial, then head on over to the first page. I'll be waiting here until you finish.
Now, let's get back to our code. Last time, we took a breather at this large section of code. The colored code is what is displayed when the XML file is loaded as per the conditions set forth by the if statement.
function loadXML(loaded) {
  if (loaded) {
  xmlNode = this.firstChild;
  image = [];
  description = [];
  total = xmlNode.childNodes.length;
  for (i=0; i<total; i++) {
  image[i] = xmlNode.childNodes[i].childNodes[0].firstChild.nodeValue;
  description[i] = xmlNode.childNodes[i].childNodes[1].firstChild.nodeValue;
  }
  firstImage();
  } else {
  content = "file not loaded!";
  }
}
In the first line, I set the variable xmlNode equal to this.firstChild. The reason I am doing this is that I will be using this.firstChild frequently, so assigning that chunk of text to xmlNode simplifies accessing it by mere humans.
In the next two lines I declare the variables image and description as arrays. You will see why in a few seconds.
total = xmlNode.childNodes.length;In this line, I set the value of the variable total equal to the total length of the number of childNodes our XML file contains. That helps Flash to keep a digital track of how many images there will be.
Imagine each instance of the childNode in the XML file to be one rung on a ladder. If you are climbing, once you reach the final rung, you can't go beyond that. The above piece of code simply counts the number of "rungs" and gives you an accurate outlook on how far you will have to travel. In Flash terms, the above code counts the number of childNodes, and thus gives you a nice number of how many items you may have to process.
Here is a graphical example using fictitious XML data:
Using the xmlNode.childNodes.length code for the above XML data will provide you with the number 3 because there are 3 nodes in your XML file. But, the problem is that Flash starts numbering at 0, while the childNodes.length code starts counting at one.
Our task is to come up with a piece of code that will cycle through each node, extract the attribute data (image and caption) from each node, move to the next node, repeat the extraction process, and stop after reaching the "final rung" of the XML ladder.
The code I used is as follows:
for (i=0; i<total; i++) {
  image[i] = xmlNode.childNodes[i].childNodes[0].firstChild.nodeValue;
  description[i] = xmlNode.childNodes[i].childNodes[1].firstChild.nodeValue;
}
In these lines, I use a for loop to cycle through each childNode in the XML file, and I assign each node's image and caption attributes into the image and description arrays. Storing the image and caption data in an array greatly simplifies accessing the data later because everything is contained in two variables with an index position.
How does Flash know that it should stop as it reaches the end of the XML file? That is answered by the xmlNode.childNodes.length code you set equal to the variable total. The loop cycles through and increments the index position of the image and description arrays until the variable i reaches the end of the XML file denoted by the data in the variable total. I use a < operator as opposed to an <= operator because, remember, childNodes.length starts counting from 1 while the XML data is read from 0.
If you want to view all of the data now contained in your image array, simply add a trace(image) code in an appropriate location after the conclusion of the for loop. You will see that, when you preview in Flash, that all of the image paths from your XML file are displayed. You can also use trace(image[0]) to display your first image, and increase the 0 to a number less than the total length of the array to get the exact file. Of course, while I only focused on the image array, the description array works similarly. The only difference is that the description array stores the caption data from the XML file.
In my view, the complicated part is getting the XML data from an external XML file and transporting the data to a variable in Flash. You have just finished that! The rest of the coding is just simple manipulations and calculated luck to get the photo gallery working. I'm joking about the luck part...kinda!
All of this page was spent on explaining how you can take data from an XML file and store it in Flash as an array. There is more coding that needs exploring, and explore it we shall....in the next section.
This is page six of this tutorial, so if you stumbled here without having completed the previous section, click here to catch up on all the exciting stuff that you missed in the previous section. If you haven't even started this tutorial, then head on over to the first page. I'll be waiting here until you finish.
The following code is used to help you cycle through the pictures by simply using your left and right arrow keys on your keyboard:
listen = new Object();
listen.onKeyDown = function() {
  if (Key.getCode() == Key.LEFT) {
  prevImage();
  } else if (Key.getCode() == Key.RIGHT) {
  nextImage();
  }
};
Key.addListener(listen);
The line-by-line explanation:
listen = new Object();I create a new object called listen because I want to give this object the properties of a "traditional" object such as a movie clip without actually creating a movie clip and placing it on stage.
listen.onKeyDown = function() {This is the event handler for the listen object. I want this code to execute only when a key is pressed, and I used the onKeyDown handler to ensure that.
if (Key.getCode() == Key.LEFT) {
  prevImage();
} else if (Key.getCode() == Key.RIGHT) {
  nextImage();
}
Because I want Flash to react when the left or right arrow keys are pressed, the above code uses an if and else-if statement to check and react accordingly when the arrow keys are pressed.
When the left key is pressed, the prevImage() function is called, and when the right key is pressed, the nextImage() function is called. Those two functions will be covered later, so don't worry about them right now.
Key.addListener(listen);This line enables the listen object to react to the onKeyDown handler when a key, in our example, is pressed.
The following is the code for getting the left and right buttons to work:
previous_btn.onRelease = function() {
  prevImage();
};
next_btn.onRelease = function() {
  nextImage();
};
While users can navigate using the arrow keys, having on-screen buttons makes your photo gallery more user-friendly. The above section of code uses each button's onRelease event handler to invoke either the prevImage() or nextImage() function!
If you remember, you gave the previous and next buttons the instance names previous_btn and next_btn a few pages ago.
In the photo gallery, you see two numbers. The first number represents where you are in the photo gallery with respect to the second number - the total number of images in the gallery.
The code responsible for displaying the above info is:
function picture_num() {
  current_pos = p+1;
  pos_txt.text = current_pos+" / "+total;
}
The first line declares the function picture_num(). Contained within this function is the variable current_pos that updates itself each time the variable p is increased or decreased. You will later find out that the variable p's value is modified within our, you guessed it, the nextImage and previousImage functions!
Our final line:
pos_txt.text = current_pos+" / "+total;
In the above line of code, I display the data from the
current_pos and total variables into our text field named
pos_txt. Notice that I am combining - concatenating - the
variables current_pos and total with the /
character.
Will I explain the elusive nextImage and previousImage functions in the next section? Go to the next section to find out.
This is page seven of this tutorial, so if you stumbled here without having completed the previous section, click here to catch up on all the exciting stuff that you missed in the previous section. If you haven't even started this tutorial, then head on over to the first page. I'll be waiting here until you finish.
A very important feature of this photo gallery is the preloader. The code for the preloader is the following:
this.onEnterFrame = function() {
  filesize = picture.getBytesTotal();
  loaded = picture.getBytesLoaded();
  preloader._visible = true;
  if (loaded != filesize) {
  preloader.preload_bar._xscale = 100*loaded/filesize;
  } else {
  preloader._visible = false;
  if (picture._alpha<100) {
  picture._alpha += 10;
  }
  }
};
Let's break this down into chewy, bite-size pieces.
this.onEnterFrame = function() {I use onEnterFrame because, unlike the other event handlers, I need a method of continuously looping the contained section of code automatically without requiring any user input. The onEnterFrame handler fits that requirement nicely.
filesize = picture.getBytesTotal();
loaded = picture.getBytesLoaded();
Before I explain the code, you should know that picture is the instance name of the empty movie clip that will eventually end up holding our pictures. Now, back to the code.
The variable filesize receives the total file size of the picture MovieClip. I get the file size by using the movie clip's name followed by the getBytesTotal() function. Hence, our resulting code picture.getBytesTotal().
In the second line, I find out how much of the picture movie clip has been loaded. That is accomplished by using the getBytesLoaded() function. I store the data returned by the getBytesLoaded() function into the variable loaded.
So, now I have one variable that stores how much of an image in a movie clip has been loaded. I have another variable that stores the total filesize of the image inside the movie clip. My ultimate goal, then, is to ensure that the amount loaded equals the total file size of the image. If the image has not been fully loaded, I want to display approximately what percent of the image has been loaded. Once the image loads, I want to fade-in the image and hide the preloader animation.
The above criteria is accomplished with the following code:
if (loaded != filesize) {
  preloader.preload_bar._xscale = 100*loaded/filesize;
} else {
  preloader._visible = false;
  if (picture._alpha<100) {
  picture._alpha += 10;
  }
}
In the first line, I check to see if the image has fully loaded. If the image is in the process of being downloaded, the variable loaded will not equal the variable filesize. That makes our condition true, and thus, we display our preloader.
|
|
Preloader Information |
|
I don't want to
dwell on my implementation of preloader, but I
will provide a brief summary as to how it
worked.
The preloader is a fairly simple movie clip that contains, inside it, another movie clip called preloader_bar. The mc preloader_bar is just a rectangle. According to our code, that rectangle is scaled by: 100*loaded/filesize. Ideally, when the image is fully loaded, mathematically, loaded/filesize will equal 1. Therefore, the _xscale property for the bar will reach 100% because loaded/filesize is actually multiplied by 100. When the image is being downloaded, the variable loaded will be smaller than the variable filesize, therefore loaded/filesize will only be a fraction - a number less than 1. Therefore, if loaded / filesize equals a number such as .5, multiplying that number by 100 yields 50. Finally, that would mean that _xscale for the preload_bar movie clip is 50 - only half its width. Naturally, if only a small portion of your image has been loaded, your preloader's width - horizontal scale - will be very small. Only a small portion of your preloader will be visible. If a large portion of your image has been loaded, your preloader's horizontal scale will be larger and display a greater portion of itself. Lastly, the preloader_bar movie clip is masked to prevent the bar from becoming too large, for scaling a movie clip increases its width on both the left and right sides! I could have used the _width property, but I prefer dealing with a percent value as opposed to a pixel value. All your visitors will see is a cool preloader that resembles a percentage loader bar. They don't have to know how the preloader works =) |
|
If the image is fully loaded, the condition for our if statement becomes false, and the code in our else statement is invoked:
preloader._visible = false;
if (picture._alpha<100) {
  picture._alpha += 10;
}
Once our image is loaded, there is no need to display a preloader. Therefore, I set the _visible property for our preloader movie clip to false. That ensures that our preloader is not visible while the image is fading into view.
Speaking of fading into view, the last two lines help our images to do just that - fade an image in from obscurity. There is a line of code elsewhere that sets the alpha (transparency) of your image to zero, thus making it completely invisible. Therefore, if the transparency is below 100, the alpha is increased by 10. You may want to make the < operator a <= operator if you are planning on incrementing using smaller numbers.
Ok - I will explain the nextImage and previousImage functions in the next section. Seriously! Go to the next section to learn about them.
This is page eight of this tutorial, so if you stumbled here without having completed the previous section, click here to catch up on all the exciting stuff that you missed in the previous section. If you haven't even started this tutorial, then head on over to the first page. I'll be waiting here until you finish.
An important aspect of the photo gallery is the ability to cycle through images. Let me introduce you to the first function that is responsible for cycling forward through your images:
function nextImage() {
  if (p<(total-1)) {
  p++;
  if (loaded == filesize) {
  picture._alpha = 0;
  picture.loadMovie(image[p], 1);
  desc_txt.text = description[p];
  picture_num();
  }
  }
}
What I am trying to accomplish with this code is first determine whether this image is the last in the series of images defined by the XML file. If there are 9 images, and you are on image number 9, you should not be able to load a 10th image. That's what the first if statement checks. The variable p acts like a counter variable, and it is initially declared to be zero.
If you are on your first image, then p is less than the total number of images. I use total - 1 because of the discrepancy between how XML data is numbered starting with 0 while the total number of nodes is counted starting from 1. I briefly explained that earlier.
Immediately, I make sure to increment the variable p by one - thus signifying that the next image is about to be loaded.
In the nested, second if statement, I check to make sure that the image is completely loaded by checking to see if the values for loaded and file size are equal. The previous section contains extra information about the loaded and file size variables.
If the image is, in fact, fully loaded, I set the alpha of the image to zero. If you remember, the fading-in effect of the images is dependent on the condition that the alpha be less than 100. Setting the alpha to zero allows the onEnterFrame event outlined in the previous section to successfully fade the image into view.
picture.loadMovie(image[p], 1);
desc_txt.text = description[p];
These two lines are actually responsible for loading the image into the proper location and to display the appropriate caption text into the text field.
Because image[p] and description[p] are arrays, accessing the relevant image and caption information using the p variable as an index position is easy.
Finally, I call the picture_num function. If you recall from an earlier page, the picture_num function is responsible for updating the number of the picture you are on with respect to the total number of pictures your XML file contains data on.
Now, here is the code for the back arrow that displays the previous image:
function prevImage() {
  if (p>0) {
  p--;
  picture._alpha = 0;
  picture.loadMovie(image[p], 1);
  desc_txt.text = description[p];
  picture_num();
  }
}
In the above, I undo the increase in p caused by the nextImage function. I set alpha back to zero because I want the previous image to fade in also, for I'm an equal opportunity fader after all. Ok - I'll avoid the cheesy one-liners for the rest of the tutorial...
The next two lines are exactly the same as that of their brethren in the fadeImage function. The image is loaded, and the description text field (desc_text) is updated with the previous image number. Note that the only thing that really changed in this function is the variable p.
Because p is one number less than what it was before accessing the prevImage() function, the data accessed in the image and description arrays is less by one number. To use our ladder example, you simply climbed down by one rung on your ladder. The ladder stays the same - only where you were standing dropped by one rung. Pretty nifty!
function firstImage() {
  if (loaded == filesize) {
  picture._alpha = 0;
  picture.loadMovie(image[0], 1);
  desc_txt.text = description[0];
  picture_num();
  }
}
This function is responsible for displaying the first image automatically when the animation loads without requiring any user input. I check one more time to make sure that the image is fully loaded, set the alpha to zero to enable fading, and then I load the movie.
Instead of using image[p] like I did in the prevImage() and nextImage() functions, I am using image[0]. The reason is that I want to display the first image - I am not interested in any of the other values, for there is only one first image. Therefore, I can get away with using a constant number! I use a similar method for the description array, for I use description[0] as opposed to description[p].
Ok - time for the previous section. Go to the next section to read a brief summary.
This is page nine of this tutorial, so if you stumbled here without having completed the previous section, click here to catch up on all the exciting stuff that you missed in the previous section. If you haven't even started this tutorial, then head on over to the first page. I'll be waiting here until you finish.
This tutorial is about 9 pages long, and it is easy to get lost in all the technical jargon, or worse, miss the grand unifying theme of this tutorial. I'm going to try to explain the big picture in a more human-understandable way.
Let's get back to the ladder, for I have used the ladder example several times in this tutorial. The XML file, like I mentioned earlier, is the ladder. Each pic node is the rung on the ladder. If you have a lot of pictures specified in your XML file, your ladder is increasingly taller because you now have more rungs/nodes. Then, there is you - the explorer who is climbing the ladder to see a bit further than what was visible before.
Each time you press the Next Image button, you are simply climbing up the ladder - seeing more of your surrounding that you had not seen earlier. Being ever careful, you check to make sure that you haven't reached the end of the ladder, for it is tough to climb when you have nothing to climb up on. Similarly, your photo gallery code checks to make sure that it isn't the last image in the list. After all, conventional wisdom is that you can't display what does not exist.
You decide that you want to go back down. For obvious reasons, you check to make sure that you are not already at the bottom of the ladder. That is similar to how Flash checks to make sure that it is not trying to load a previous image that does not exist because it is currently on the first image itself.
Of course, when you go up and down on the ladder, you don't suddenly jolt to your new elevation. You move smoothly from one rung to another rung on your ladder. In Flash, when you switch images, you don't just display your next image. You fade your new image into view in the form of a simple transition that takes advantage of the _alpha property.
Hopefully you don't preload data while climbing a ladder, but you did tell Flash to preload your new images before loading them into view. You accomplish that by checking to make sure that the total file size of the image is the same size as the the image that is currently being loaded. If the two file size checks are not equal, you display a small progress bar that informs your visitors about the progress. If the amount loaded equals the total file size, that means the image is fully loaded and ready for display.
Phew - this tutorial went a little longer than I had expected! I have provided the source files for you to use in MX 2004 and MX format:
 |
Just a final word before we wrap up. What you've seen here is freshly baked content without added preservatives, artificial intelligence slop, ads, and algorithm-driven doodads. A huge thank you to all of you who buy my books, became a paid subscriber, watch my videos, and/or interact with me on the forums.
Your support keeps this site going! 😇


:: Copyright KIRUPA 2026 //--

