|
by
kirupa | 11 April 2010
In one of my earlier tutorials, I gave an
overview of
events and event handlers where you learned how
to associate events with event handlers that react
to the event. What I didn’t write about was some of
the nuances of events. Let’s address that with this short
tutorial where I cover routed events and, more
specifically, event bubbling and event tunneling.
Let’s say you have a simple application that looks
as follows:

When you hover over the Log-In button, which
elements do you think receive notification of
something happening?
One of the elements that gets notified is the
button, as you would expect. What you may not
realize is that the event propagates beyond the
button and to other elements in its visual tree such
as its parent, its parent's parent, and so on.
That
roundabout way of having events routed through the
parents is what makes events in WPF and Silverlight
known as routed events.
Let’s look at an example of a simple application
broken down into its visual tree:
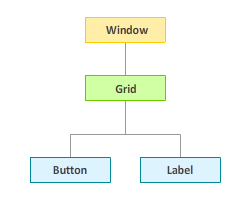
The application portrayed is fairly simple. It contains a
Button and Label (aka TextBlock in Silverlight) control nested inside a Grid
control which, in turn, is hosted by our overall
Window/UserControl control. When you hover over your button, since
the hover is a routed event, your
MouseEnter event gets recognized by your Grid and Window/UserControl
controls.
Peers are not affected. You interacting with your
Button will have no affect on the Label control that
is your peer. This is true even if your Label is
overlapping your button. Since your Label/TextBlock is never
hovered over and it is a peer of your button, it
doesn’t partake in this event
handling festivity!
While I
mentioned that your events get recognized by the
parents, the order by which they get recognized
depends on the routing strategy used. The two most
popular routing strategies are bubbling
and tunneling.
In a bubbling
strategy, you start with the control that originated
the event and traverse up the tree:
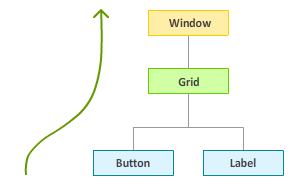
This is what I described earlier where the order
of the elements that get notified by an event on the
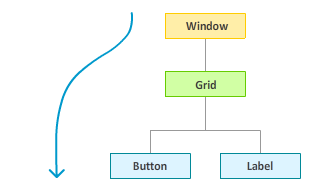
button goes from Button to Grid to Window. The tunneling strategy works in the opposite way.
With tunneling, when an event is
fired,
you go all the way to the root and traverse down
until you hit the control that originated the
event:
In WPF, you can specify which routing strategy to
use based on the type of event you are listening
for. If you look at the list of events your element
supports, if it has the word "Preview" in front of
it such as PreviewMouseLeftButtonDown, you
are dealing with a tunneling event:
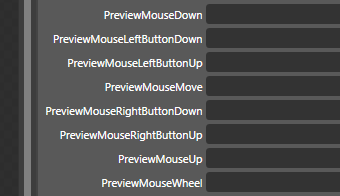
[
example of tunneling events ]
For
most of the other events that do not
have Preview in front of them, you are dealing with
bubbling events.
Silverlight only supports bubbling, so you will
always have events that move up to the root as
opposed to starting with the root and moving down.
Hopefully this short tutorial gives you some
knowledge about how routed events work in
Silverlight and WPF. One thing that I didn't touch
upon in this tutorial is
handling events. When an event is handled,
its propagation stops instantly with no other
element receiving any notifications of the event
having been fired. In a future tutorial, I will
explain how to work around that limitation.
Just a final word before we wrap up. If you have a question and/or want to be part of a friendly, collaborative community of over 220k other developers like yourself, post on the forums for a quick response!

|


