|
 Scripting
3D in Flash
Scripting
3D in Flash
by
senocular
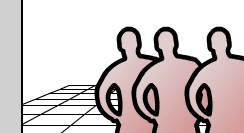
Zooming Figures
Here there are 3 movieclips, all human
figures, being moved back and forth
in 3D space being scaled and transposed
according to their positions in that
space. This scaling and movement is
based on their respective z values
assigned to each figure's movieclip
in actionscript.
[
static view with moving figures ]
Steps to Create Animation
- The
first step is, probably obviously,
the imagery. Simply draw out or
import whatever shapes you wish
to have move within the 3D space.
In this example, I drew out an outline
of a figure and gave it a linear
gradient fill. With that as a movieclip,
I put 3 on the screen and gave each
a name (figureA, figureB and figureC).
The grid is nothing more than some
lines I eye-balled and drew myself
to make seems as if they were 3D.
They are simply to give the appearance
that there is a ground for the figures
to move on. It will have nothing
to do with the future 3D calculations.
- Next
we start cranking out some code.
First, some variables need to be
set up. The first two variables
that are going to be defined are
the origin or offset and the focal
length of the perspective view.
The offset is to make sure everything
being placed in 3D is set in the
center of the screen. Without it,
because the 3D calculations are
based around the point 0,0, the
imagery would be thrown up in the
upper left-hand corner of the screen.
The origin is an object with x and
y values to allow that shift of
the imagery to the center of the
screen.
The focal length is a variable that
sets, as it implies, the focal length
of view which determines how much
perspective is seen for any given
position in space. The larger the
focal length, the less things seem
to distort in any span within a
distance along z. The value 300
is pretty average, so that will
be used here.
- Now
variables can be defined for each
figure to represent their position
in 3D space. This will require x,
y and z properties - one for each
axis of movement/positioning. These
values will determine its "real"
position as we know it. They are
then used with the focal length
to determine how to represent each
figure on the screen visually as
it should appear on a 2D screen
though it's technically in 3D -
at least as far as we are concerned.
We'll give each a slightly different
x and z position so that they are
staggered in the space.
Along with the x, y and z, another
variable, dir, will be defined for
each figure. This represents the
direction of each figure as it moves
in the screen. Each figure is either
moving forward or backward based
on the value of this variable dir.
One more variable, speed, will be
added to determine how fast the
movement of each figure is in the
scene. Mind you these variables
dir and speed are not associated
with the 3D aspect as much as they
are just methods of controlling
movement in the 3D space.
- A
function must now be created to
handle the onEnterFrame event of
the figures as they are moved within
the 3D space. This will do two things.
One, it will move each figure back
and forth along the z axis using
speed and the dir variable of each
figure and two, it will calculate
the needed scaling, positioning
and transpositioning for each figure
so that it appears to be in 3D on
the 2D screen. Now, this function
operates for one figure at a time,
so each figure would need to have
this function defined for it to
be moved and scaled etc. First it
is written as a normal function
and then set for each figure's onEnterFrame
event so that it won't need to be
re-written for each. All three figures
will use that same function for
their enterFrame. And that function
is as follows:
The first portion of the function
just moves a figure's z value using
speed and the dir variables. Following
that, starting with the definition
of scaleRatio is where the 3D starts
to come into play.
The scaleRatio variable is derived
from the figure's current z value
and the focal length using the perspective
formula. This is then used to correctly
move and scale the figure for it's
appearance on the 2D screen. Position
(_x and _y) is based around the
origin's position along with scaled
x and y values for that figure and
size (_xscale and _yscale) is based
on 100% times the value of scaleRatio.
With that, you have a correctly
positioned and scaled clip on your
2D screen that appears to be in
3D.
The only remaining code is the swapDepths.
As mentioned before, the swapDepths
is based on z. Setting the depth
of the figure to a negative z value
assures that if its closer to view
its on top of other figures in the
scene.
- The
last step is setting that backAndForth
function to be the onEnterFrame
event functions for each of the
figures so that each figured is
positioned and scaled accordingly
every frame.
And that's about it. The whole
idea is to have your own values
for 3D positioning in x, y and z
and use the scaleRatio (based on
the focalLength variable) to determine
the actual _x and _y positions on
the screen so that on the screen,
in 2D, they appear to be in 3D.
There are numerous pages and many
more examples for you to go through,
so feel free to take a quick break
and proceed to the other tutorials.
|
|
|


