|
by
kirupa | 25 April 2009
In the
previous page, I introduced this topic and gave
you a quick example of how you can use nothing but
code to have something visual show up on your
screen. In this and subsequent pages, you will learn
more about the details of how that worked and more.
It may seem a bit odd at first, but a visual element
such as a Control, UIElement, etc. is nothing more
than a class with some visuals attached to it. For
the sake of simplicity, I am going to focus
primarily on controls, but everything you see can be
applied to any visual element you run into.
Anyway, the syntax you
would use for declaring and initializing a class is
the same one you can use with controls as well. For
example, as you may have seen in the button example,
the code for declaring and initializing my button is
as follows:
- Button
clickMeButton
=
new
Button();
I create an object
called clickMeButton,
and it its of type Button as well. Pretty much every
control you could ever imagine using can be
programmatically generated this way such as a
CheckBox,
Listbox,
RadioButton,
ScrollViewer, etc.
Simply declaring and initializing your control is
not good enough to have it appear when you run your
application. What you need to do is add it to your
application's visual tree. To explain differently
without mentioning "visual tree", internally, all of
your controls and everything you see in your app is
nested in some hierarchy. This hierarchy determines
the order in which content is drawn, what appears
above what else, and more. This hierarchy is
commonly called the visual tree.
What you need to do is
find the right location in the visual tree to add
your control to. Once you do that, your control will
be visible. This is actually pretty straightforward.
If you look in your Objects and Timeline panel in
Expression Blend, you will see a snapshot of your
visual tree for the elements that have been defined
in XAML:
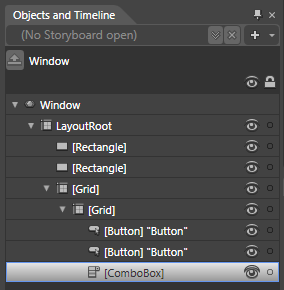
[ your object tree provides a visual representation
of elements defined in XAML ]
Notice the nesting
that is taking place with controls being placed
inside other controls such as Window, LayoutRoot,
and the two Grids. Those controls that can host
other controls are quite special. Your task is to
find a reference to one of those host controls and
add your control into them.
If you can't think of
any controls that would work, the controls you see
in the Layout menu such as the Grid, Canvas,
Wrap/StackPanel, etc. will work:
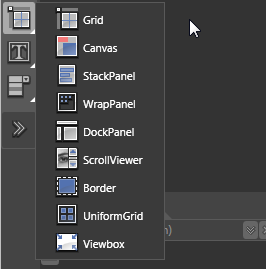
[ any layout panel will allow you to add children
elements ]
To get all technical
on you, any control that derives from Panel such as
the controls you see in the above menu will work.
Content controls such as Button will work as well,
but you are limited to only one child.
Anyway, all of this
banter gives you some background, but it probably
doesn't solve your problem. To have your control
appear, first pick which element it will be nested
under. For a new Silverlight or WPF application,
Blend automatically creates a Grid layout panel
called
LayoutRoot
for you. You can use LayoutRoot as the parent of a
control you want to add:
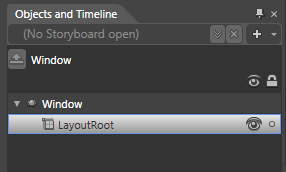
[ you can always place your controls into the
LayoutRoot ]
Now that you have
found a control, the next step is to tell your newly
initialized control to add itself to it:
- Button
clickMeButton
=
new
Button();
- this.LayoutRoot.Children.Add(clickMeButton);
Notice, in the above
code, I directly get a reference to the LayoutRoot
element, access its Children collection, and use the
Add method to pass in the name of the new Button
object I created. Once you have done this, when you
run your application, your Button object will be
created, and it will be added to the visual tree
under your LayoutRoot Grid element.
The only thing to note
is that, if you were to add controls in Blend with
the goal of programmatically placing children under
them, you will need to explicitly name them. While
there are ways to access unnamed elements via code,
it is much easier to go
this.ElementName as opposed to
iterating over all elements in the tree.
If you run your
application at this point, you will see the button
displayed. It will probably display at a size and
appear in a position that you probably don't want.
Let's fix that next.
The default size your
controls get when they are added are determined by
either the control's defaults or the panel they get
placed into. For the most part, the default values
are not what you would want. You can easily change
the size of your controls by setting the Width and
Height properties:
- Button
clickMeButton
=
new
Button();
- clickMeButton.Width
=
100;
- clickMeButton.Height
=
30;
-
- this.LayoutRoot.Children.Add(clickMeButton);
Running the
application with the above two lines set, my button
no longer fills up the entire window:
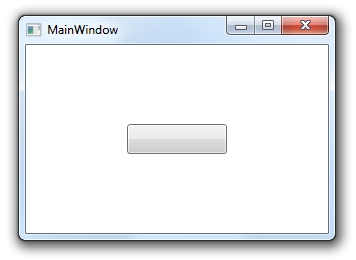
[ my button is a more respectable, presentable size!
]
When you set an
explicit value for Width and Height, the values are
absolute. No amount of window or browser resizing
will cause your control's size to deviate from what
you have specified.
Alas, we get to
the more tricky part of this article - that is, how
do you position an element exactly where you would
want it? Positioning your elements depends greatly
on the panel you are parented under. For Canvas, you
can do the following:
- Button
clickMeButton
=
new
Button();
- clickMeButton.Width
=
100;
- clickMeButton.Height
=
30;
-
- Canvas.SetLeft(clickMeButton,
75);
- Canvas.SetTop(clickMeButton,
100);
-
- this.LayoutRoot.Children.Add(clickMeButton);
The Canvas's SetLeft
and SetTop methods can be used to specify the X and
Y position of your control. In my example, my button
will be positioned at x/y coordinates 75, 100.
For all controls that
are not somehow nested under a Canvas, the above
approach will not work. You will instead need a more
general solution that involves either adjusting the
margins or fiddling with the transforms. I describe
how to adjust the transform in the following blog
post:
http://blog.kirupa.com/?p=64
Properly positioning
elements will require another article of its own, so
I am not going to go into any more detail. The one
thing to note is that the element itself takes care
of some of its positioning, but many layout panels
such as Grid have alignments and columns/rows that
affect the alignment of all of their children as
well. You should not ignore the parent in favor of
the child or vice versa. I guess that is just good
advice for life in general!
Onwards to the
next page!
|


