|
by
kirupa | 9 December 2007
In the
previous page, we took inventory of our code and
discussed what it does. Now, in this page, let's
revisit our original problem and look at an easy way
to solve it.
The last two pages gave you an overview of the
application you downloaded and are about to modify.
Now, let's revisit why you are reading this tutorial
in the first place. We already have a data binding
in place between our list of people and the listbox.
What we want to do is use our textbox and Add button to
add more items to our listbox.
The trick is, we want to do so while maintaining
the existing data binding. We don't want to directly
add the item to our listbox by using our listbox's
Items collection, for that essentially
overrides the data binding we have in place.
Instead, we want to add the item to our existing
data binding relationship maintained by our
PeopleList object.
Now, if you looked at the code, you may be
wondering where our PeopleList object actually
lives. There is nowhere where you define a new
object of type PeopleList and bind it to our
listbox. The problem is that you are, more than
likely, looking at the
C# code. With WPF applications, you have code in
your code-behind file, but you also have code in
your XAML file. If you take a look at Window1.xaml,
find the tag beginning with
ObjectDataProvider
inside your Window.Resources.
The line you will find should look like the
following:
- <ObjectDataProvider
x:Key="PeopleListDS"
d:IsDataSource="True"
ObjectType="{x:Type
CollectionsDataBinding:PeopleList}"/>
Notice that this particular line contains the
information that is used by our listbox to bind to
our PeopleList collection. What we need to do is gain access to this same
PeopleList instance so that we can make
modifications to the live data source used. Let's
look at how to do just that.
As you saw in the preceding section, our PeopleList
object is instantiated in the XAML file. Our event
handler for the Add button,
AddButton_Click is
in the code-behind file written in C#. What we are
going to do is access the data source defined in
XAML using C# code.
Add the following lines of code in your
AddButton_Click method directly above where you have
the line NameInput.Text =
String.Empty code:
- ObjectDataProvider
odp
=
this.FindResource("PeopleListDS")
as
ObjectDataProvider;
- PeopleList
people
=
odp.Data
as
PeopleList;
-
- Person
newPerson
=
new
Person();
- newPerson.PersonName
=
NameInput.Text;
-
- people.Add(newPerson);
Your entire AddButton_Click event handler should
look the following:
- private
void
AddButton_Click(object
sender,
RoutedEventArgs
e)
- {
- ObjectDataProvider
odp
=
this.FindResource("PeopleListDS")
as
ObjectDataProvider;
- PeopleList
people
=
odp.Data
as
PeopleList;
-
- Person
newPerson
=
new
Person();
- newPerson.PersonName
=
NameInput.Text;
-
- people.Add(newPerson);
-
- NameInput.Text
=
String.Empty;
- }
With your code copied and pasted, let's run this
application. Press F5 or go to Debug | Start
Debugging or simply hit the green Play button in
your toolbar. In either case, your application will
start to run. Once your application is displayed,
type a name into your textbox and press Enter or
click on the Add button:
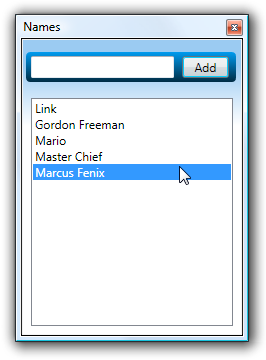
[ a new name has been added! ]
For example, I typed in the name Marcus Fenix
(from
Gears of War fame) into my textbox and clicked
on the Add button. Notice that the name I entered
was added to my listbox! You basically solved the
problem that was mentioned at the beginning of this
tutorial and reiterated at the top of this page.
You are not home free just yet. In the
next page, let's look at the code in detail and
understand why the code worked.
Onwards to the
next page!
|


