by
luksy | 4 November 2005In the
previous page,
we setup our stage and basic properties of our movie. In this page, you will
create and animate the shapes that form the loop portion of our movie!
Adding Effects to a Solid
- Create a new solid by going to Layer | New | Solid (Ctrl+Y). Accept the default settings and click OK.
The solid is automatically inserted in your composition.
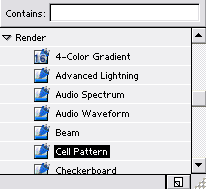
- Open up the Effects & Presets palette by going to Window | Effects & Presets (Ctrl+5).
- In the Effects & Presets panel, go to Render | Cell Pattern (You can also just type the name of the effect in the 'Contains' input box).

[effects & presets panel]
- Drag and drop the effect onto your solid in the composition.
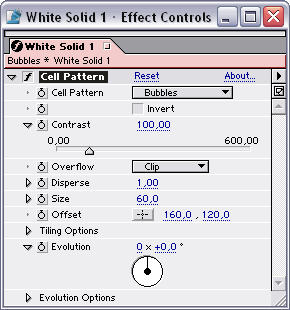
The effect controls for the solid should automatically open.

[effect controls for the Solid layer]
Now that our shape is drawn, let me explain how to go about
modifying the effects.
Controlling the Effects
The following ALL depends on your own personal taste. But for the sake of
the tutorial, follow my steps and after finishing the tutorial you will be
completely free and on your own.
-
Cell Pattern: Bubbles - we want our pattern to be bubbles.
After all, we're making bubbles. So we want the bubbles!

-
Check the Invert to invert the colors. Looks better if you ask me, but it'll look even better later on.
-
Raise the contrast to about 150%.
-
Leave the Overflow as it is (Clip).
-
Raise the Disperse to the maximum of 1,50%. To get the randomness look better.
-
Pull the size down to about 50-40% or whichever size suits you.
-
Leave everything else untouched but pull down the Evolution and Evolution Options.
-
Make sure that you are at the beginning of the timeline and click on the little stopwatch by Evolution. The Evolution should turn to some bluish color.
-
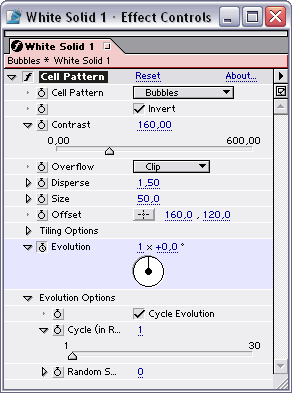
Under Evolution Options check the Cycle Evolution checkbox.
-
Go to the end of the timeline by going to Window>Timeline Controls (Ctrl+3) and clicking the Last Frame button (
 ) or by pressing the END button on your keyboard.
-
In the Evolution above the circle where it says 0 x + 0,0 change the first zero to 1 so it would say 1 x + 0,0.
In Step 11, 1 x +
0,0 means that it will make one circle of evolution from the beginning to the end. You can also make it faster by typing in a higher number. If you wish to change the number, be sure to be on the last frame of the animation! After Effects automatically makes a keyframe wherever you change the setting. We don't want to have it wherever. We want it at the end.
But hey, who says that you HAVE to? Why not doing one circle from the beginning to the half of the animation and then a hundred more to the end? Just kidding. But then again, let your imagination go wild. ;) Now stop playing around and delete all the keyframes you accidentally made and make sure you have only one at the beginning and one at the end.
If you're new to After Effects you should be asking: "...but luksy, how do I delete the keyframes I made when I was letting my imagination go wild?" Let me show you
young padawan.
But first, let me show you what your Effect Controls window should look by now (at the end of the timeline).

[ effect controls at the end of the timeline after adjusting the options ]
Deleting Unnecessary Frames
If you're aware of how to do this in After Effects, you can step away, ignore this part, and go to the next one.
- See the timeline at the bottom? Yes? Ok. You should also see your solid which is the only layer in the timeline. At the right of the layer name, you should see a little box. This shows your solid color.
But let's go further left and you should see a number 1. Let's go even
further left and you should see another colored box. That's your label
color. But let's finally go a bit further left and you should see an arrow
pointing right. Click on that:

[ the arrow I'm talking about ]
-
Effects and Transform should appear. Open up Effects by clicking on the little arrow pointing right. The name Cell Pattern should appear.
-
Open up Cell Pattern by clicking on the arrow thingy.
-
A lot of options should appear. These all options show you what can be animated by adding keyframes and such. At this point, only Evolution interests us.
The little clock should be turned on and by looking right on the timeline you should see two keyframes. One at the beginning and one at the end. Oh yeah, maybe more if you did some of your own Evolution tweaking.
-
To delete a keyframe, just click on it to select it and then simply press Delete button on your keyboard to delete it.
If you have only two keyframes of Evolution at the beginning and the end, don't delete anything, but if you do have more keyframes, just delete them all except the first and the last one.
You are almost done. We just have to do finish up some loose ends with our
video and get the video into Flash!
Onwards to the next page!
|