by Danielthelion | 23
November 2005
We are nearing the end of this tutorial! In the
previous page,
you created the keyframes that will adjust our animation.
Let's pick up from there.
Some of you may be wondering, "why not just use motion
tweening? After all, its a lot faster isn't it?" Faster,
yes, but for really great character animation, or for
maximum control, key framing it the way to go. So, how do we
know where and when to place our ball? Well, on frame 1 the
ball is up, assuming we want to make a cycle, we would place
the down position in the middle and then end where we
began...correct? Well, good enough for right now, so lets
find the middle. Let's see, half way between 24 is 12
right...."but , but Daniel!" you say, " there isn't a
keyframe on frame 12! Frame 12 is still part of keyframe
11!" Ok, poindexter, so lets put it on frame 13, no need to
get all worked up. Animation, after all, is about life, and
life doesn't always add up, so we roll with it...
We go to frame 13, select our ball, and then, the way I like
to work, is I usually hold shift down and use the arrow keys
to bring the ball down to the ground plane. We want to get
that ball touching the ground, so don't be afraid to zoom
right into that bad boy. Frame 13 should look something like
this:
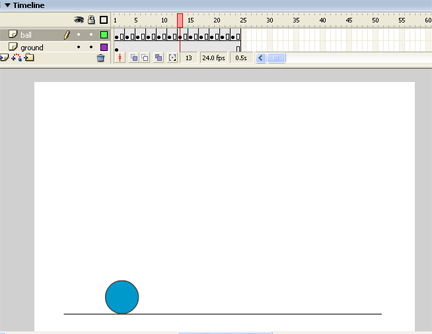
[ on frame 13,
ensure the ball hits the line ]
Now we connect the dots. We go back and forth between frame
1 and frame 13 and we figure out where to put the 5 drawings
we have that will give us the best "feel". To do this we ask
ourselves what we know about the world around us. What
affecting the ball? Gravity and the ground. How does gravity
affect the ball? Well, as the ball drops it is going to pick
up speed. What does this mean for our animation? This means
that our drawings are going to be spaced differently in
relation to one another.
So
as the ball is just beginning to drop we'll place the
drawings closer together so the action happens slower. As
the ball begins to get pulled down by gravity, we place the
drawings further apart. This creates the illusion that the
ball is moving "faster". Spacing is a somewhat complicated
concept to grasp and requires a significant amount of
contemplation to really grasp. I encourage anyone truly
interested in character animation to really think about the
differences between Timing and Spacing.
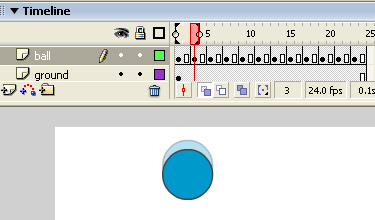
Select frame 3, your 2nd keyframe. Now, to view the spacing
of your keyframes, we use the onionskin option. This can be
turned on by clicking the small button on the bottom of your
timeline that looks like 2 overlapping squares. There's
actually 3 buttons that look like this. We're using the one
that's furthest left. Click it and you'll see 2 draggable
"handlebars" that appear on your timeline. These represent
the scope of your onionskin. Since we only want to see how
our current drawing relates to our first drawing, we drag
the left handlebar all the way to the left and we make sure
the right handlebar is directly over our current frame. In
case your lost, make your screen look like mine:

[ the onionskin
button ]
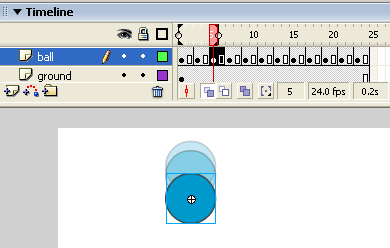
If you select the ball and begin moving it around you'll
notice that you can see not only it's present location but a
ghosted image of the previous drawing. That's what our
onionskin does for us. Lets put it to good use. Assuming our
ball on keyframe two is currently in the same exact position
as keyframe one, we use our arrow keys to begin nudging it
down. My 2nd keyframe looked like this:
[ viewing frames
with onionskin enabled ]
So in my mind, I am imagining gravity is starting to work
it's magic on our ball. For our 3rd keyframe we're going to
move our ball significantly further from its starting point.
When you select your 3rd keyframe you'll have to make sure
to re-drag the left handle of the onionskin so that it's
over the first keyframe. This allows you to see the 1st AND
2nd drawings along with the 3rd. Shoot for something like
this:
[ notice the three
keyframes of positions visible ]
We continue in this fashion with the next 3 keyframes,
gradually increasing the spacing as gravity takes hold of
the ball. By frame 11 this is what I have:
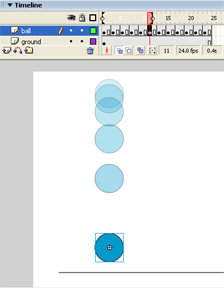
[ a static preview
of your animation ]
The next keyframe is the point of contact for the ball
and the ground. For the most part, our sequence is complete.
To make it a cycle, we need only to work backwards. To do
this, we use a process of simply copying our 1st set of
keyframes in reverse. Stay with me here. If you think about
it, it makes perfect sense. Our ball makes contact with the
ground on frame 13. On frame 15 we copy and paste the
keyframe from frame 11. On frame 17 we copy and paste the
keyframe from frame 9. On frame19 we copy and paste the
keyframe from frame 7. On frame 21 we copy and paste the
keyframe from frame 5. On frame 23 we copy and paste the
keyframe from frame 3. Once the playhead reaches that last
keyframe it loop back to frame 1 to complete the cycle. Its
kind of like a yo-yo.
This is what your animation should look like when your
done:
[ our ball
moves up and down more naturally ]
There is more to be done. So onwards to the
next page!
|


