by kirupa |
23 September 2006In the
previous page, you saw an
example of an application created using ClickOnce. In this
and the next few pages, let's create our own application and
deploy it via ClickOnce.
In order to use ClickOnce, let's first create a very
simple C# application. The following steps should help you
out:
-
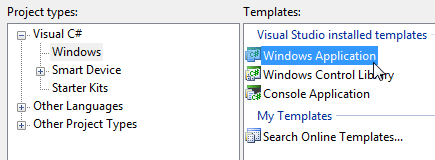
Launch Visual Studio 2005. Go to File |
New | Project. From the New Project window, ensure your
Project type is set to Visual C# | Windows, and select
Windows Application from the Templates pane:
[ create a new Windows Application C#
project ]
-
From the same New Project window, set
the name of your application to ClickOnceDemo:
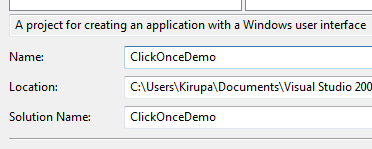
[ call your new application
ClickOnceDemo ]
After you have given your project the
ClickOnceDemo name, press OK to accept the changes and
create a blank application.
-
You should see a blank form resembling a
Windows window. From your Toolbox, click on the Label
component and draw a label in the middle of your form:

[ draw a new label ]
-
Select your newly drawn label with the
mouse cursor. Look in your Properties Panel, and find
the property labeled Font and expand that
property to display the sub-items:
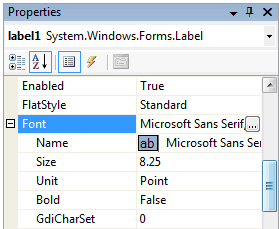
[ expand the Font property from the
Properties dock ]
-
In the sub-property labeled Size,
replace the value (8.25 in the above screenshot) to 36.
Now, scroll down your properties until you find the Text
property. Replace label1 with the word ClickOnce.
Your form should look like the following image:
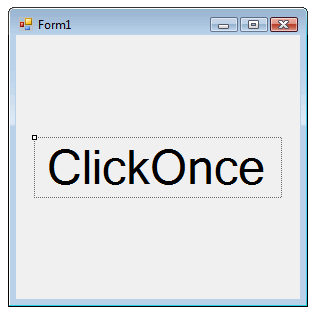
[ how my simple application looks in
Visual Studio ]
-
If you want, you can make further
adjustments to your form. For example, renaming it to
something other than "Form1" or resizing the window to
just display the ClickOnce label, etc. Those are
visual/aesthetic changes that aren't relevant to this
tutorial, so I will not explicitly cover them here.
-
Save this file and test it to see how it
looks. The final application should look almost the same
as the form you designed in Visual Studio.
Now that we have our sample application
working, let's figure out how to deploy it using ClickOnce.
Onwards to the
next page!
|


