by kirupa |
23 April 2007In the
previous page you added and modified a circle. In this
page, let's continue by making a few more tweaks and adding
some extra circles!
-
Right now, your circle is fully
visible. What we really want is a slight transparency
applied to the entire circle to make it blend better
with the background. To adjust the background for the
entire circle, you will need to alter the OpacityMask
property.
Select your OpacityMask property from the Brushes panel
and select Solid Color Brush:

[ select the OpacityMask property to adjust transparency ]
-
Your OpacityMask helps determine how
visible (or how transparent) your selected object is.
You can try the colors of your selected object using the
displayed color box, but nothing will happen. The main
thing the OpacityMask property looks at is the Alpha
channel (A):

[ the Alpha channel determines how transparent your selected
object is ]
Click on the A (Alpha) field and enter a
value of 60:

[ select the Alpha (A) channel to adjust the level of
transparency ]
After entering 60 for your circle's Alpha,
you will see your circle becoming partially transparent.
This means that part of your background is now visible
through your circle itself:

[ your circle is partially transparent now ]
-
The last thing we are going to do is
copy and paste a few more circles and scale them. Make
sure your circle shape is still selected in your
Artboard, press Ctrl + C (or go to Edit | Copy) and
press Ctrl + V (or go to Edit | Paste).
-
While it may be difficult to see, a
copy of your original circle has now been placed
perfectly on top of your original circle. Click on the
circle and drag your mouse to move the circle to a new
location:

[ paste a copy of your original circle ]
When you pasted your circle, I mentioned
that it was difficult to notice that because they are
perfectly placed on top of each other. While that is true
when observing the Artboard, when you look at your Objects
and Timeline tree, you will see two copies of your Ellipse
shape representing our two circles:

[ a better way to find and select objects in your Artboard ]
The timeline makes it easy to know exactly
which objects are currently placed on your stage, and that
is helpful when trying to select objects covered up by
another object or selecting an object that is completely
transparent/invisible.
-
Make sure your newly pasted and moved
circle is selected if it already isn't. Notice that a
box outline with eight small squares is displayed around
your selected circle in the Artboard. You can click on
any of the boxes and drag the mouse to skew and scale
your circle's shape.
What we want to do is make our circle bigger. You can do
that by clicking on any of the corner boxes and dragging
your mouse outward:
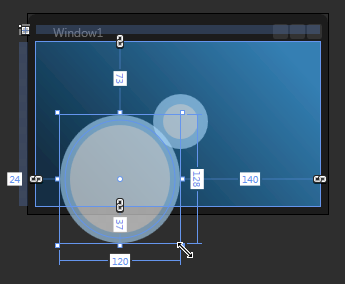
[ you can scale an object by clicking on a corner box and
dragging with your mouse ]
When scaling using this approach, you
might find that the scale isn't even. Unless you are
dragging outward in a perfect 45 degree angle, your scaling
will skew your object to be more horizontal or vertical than
you want to.
To fix that, hold down your Shift key when
dragging or prior to releasing your drag action. Holding
down your Shift key sets the horizontal and vertical scale
values to be the same:

[ holding down your Shift key while dragging makes the
scaling even ]
We're almost done now. All that is left
are some more finishing touches, so let's wrap this up on
the
next page.
Onwards to the
next page!
|


